
Customise your Message Groups to Promote conversations that matter
- Kelly Pringle

- Sep 8, 2020
- 4 min read
Updated: Mar 25, 2022
One of the more challenging aspects of managing an online community is considering how to stimulate engagement, as well as creating ongoing opportunities for re-engagement.
Fabrik offers powerful real-time Messaging functionality to bring your audience closer through easy-to-configure message groups called Conversations and Channels.
What are Conversations and Channels?
Each message group type you create can be categorised as either a 'Conversation' or a 'Channel' which empower you with different ways to engage your members based on your specific needs.

What is the difference between a Conversation and a Channel?
Channels are read-only message groups in which only 'Trusted' individuals (members who you assign the 'Trusted' status, such as administrators or moderators) can post content.
Channels are especially useful for when you need to broadcasting information to a wide audience and don't require a response i.e. a Security channel in an emergency situation, or a dedicated Special Offers channel for adding value to your advertisers.
Conversations are interactive message groups where anyone who is a part of that conversation can post content.
A Conversation is a useful tool to have in your app when you're seeking active engagement or feedback from your audience, or would like to bring your community together around topics of interest.
How can I set up a conversation or a channel?
Log in to your Community Centre portal to administer your Conversations and Channels.
Adding, editing, and removing a message group as simple as tapping a few buttons, uploading your image and presto! You're now ready to connect with your audience more meaningfully.

When creating a message group, it’s important to know and understand the different options you have available to you. Here's a quick introduction to the various settings.

Step 1: Set your group Name, Description and Image
When choosing a name, try to be as concise as possible, as a long name i.e. name with multiple words, may run onto two lines.
You'll also be required to add a description to each message group so your members know its purpose, as well as any guidelines that apply to that particular group.
When creating images for conversations and channels, it's best to use a plain image with no text or logos, with a slightly dark colour, or overlay.
Then, select the Settings tab to toggle your Conversation's/Channel's settings.
Step 2: Depending on whether you're creating a Conversation or Channel, select your preferred message group type.

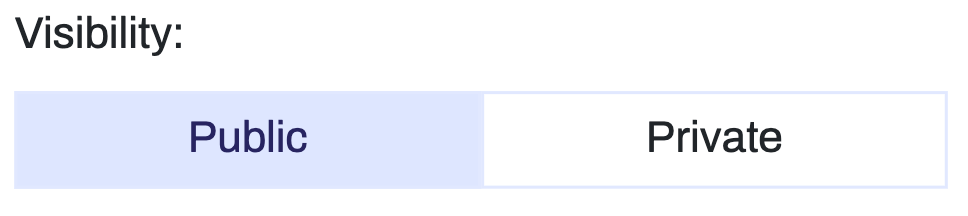
Step 3: Set your Visibility. The Private option provides the opportunity to invite specific members to be a part of a hidden and secure Conversation or Channel which will not be visible to members who have not been added.
Step 4: Options for Public message groups
If you've created a 'Public' message group, the following options provide you with even more flexibility.
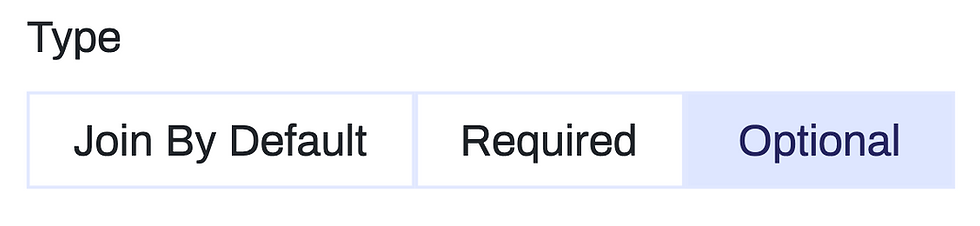
Join by default All members will automatically be joined to this message group when they register their profile for the first time. They can choose to opt out afterwards. This can be useful when you'd prefer your audience to be part of a particular message group, but would still like to give them the option to opt out, i.e. in a Special Offers channel.
Required If you set a message group as 'required,' all existing app members will be automatically added to this message group and will not be able to opt out. This is useful for Announcements or Security channels.
Optional App members can join this message group if they’d like, and opt out whenever desired. Optional groups are useful when related to very specific topics like Gardening or Pets, that may only appeal to a certain subset of your audience.
Step 5: Notify by Default Configure any message group to receive push notifications by default. Note that your members will still have the option to enable or disable push notifications on any Conversation or Channel if they wish to do so.

Your direct messaging channel with each member
While Conversations or Channels are to be created by your team according to the custom needs of your community, a standard conversation that you'll find within your app is the direct message space in which each individual can communicate privately with you. Messages received from this conversation land into your community's Smashboard for an administrator to see and respond to quickly.
Messages sent via this conversation (often referred to as Contact Us but can be customised) are only visible to yourself and that particular member, and become an important part of the way that you're able to be of service individuals.
This is a great solution for a helpdesk, control centre, or studio environment as it brings all your inbound direct messaging engagement into one place!
Watch our Smashboard webinar to find out how to use this channel effectively.
Content Moderation - coming soon!
As any online engagement platform grows in size and chattiness, it's important that community administrators have a mechanism to review and moderate all content being shared to avoid content that contravenes community guidelines.
Look out for new functionality coming to your mobile app and Community Centre soon to assist you in doing so, which you can read about in August's emailer.
Further info
Explore the features of Community Centre.
Offer a Message group to your advertisers.
Watch our walk-through of the Smashboard messaging management portal.
And of course, get in touch with our Customer Success team if you'd like some help with setting up a new Conversation or Channel.


Comments